JWT / OAuth 2.0 / OIDC
Verification of identity via JWT tokens has become the standard for authentication in recent years, with the most popular authentication flow being OAuth 2.0 combined with OpenID Connect (OIDC) identity tokens.
Typical OAuth Authorization Code Flow
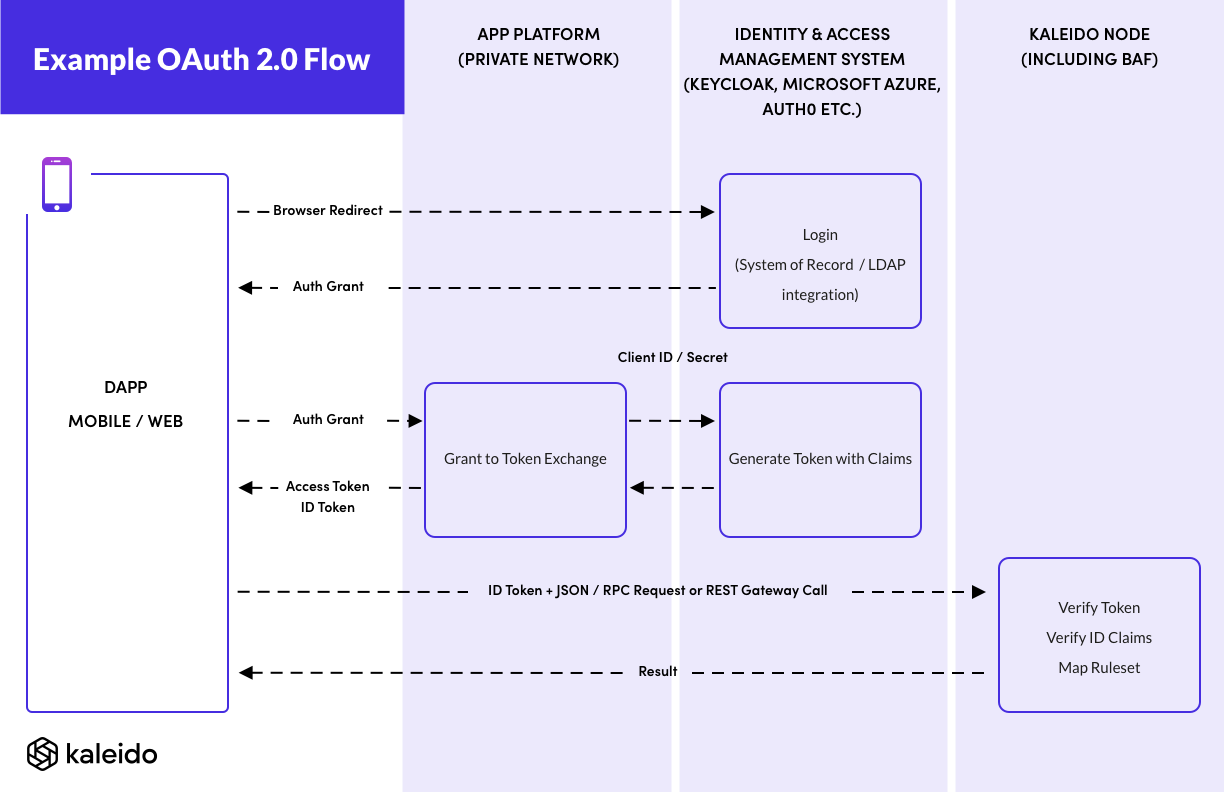
Here is a typical example of an OAuth 2.0 Authorization Code flow with KeyCloak running alongside an application backend in a private network.

Kaleido here is acting as the OAuth Resource Server. Notice that in this authorization flow Kaleido never needs to perform outbound communication with either the application or the IAM server, so the IAM can be behind your firewall.
Kaleido is configured with the public keys to verify the JWT token issued by the IAM server.
We use KeyCloak as an example here, as it can be run behind your firewall for an instance of an enterprise application managed by a participant in a business network, and be connected to your system of record such as an LDAP server, or Microsoft Active Directory.
You could replace KeyCloak here with any OAuth 2.0 compliant Authorization Server. Examples include:
- Microsoft Azure Active Directory
- Amazon Web Services (AWS) Cognito
- Otka
- Auth0
Single-page Web Applications and Mobile Apps with no backend
Some modern web and mobile apps are designed without a back-end at all. They run exclusively on the client device. In these cases the Authorization Code OAuth flow is not possible, as it requires a backend to hold the client secret that authenticates the application with the IAM server.
In these cases you can explore whether the Authorization Code Grant using Proof Key for Code Exchange (PKCE) or Implicit Grant OAuth flow best fit your requirements.
The Kaleido part of the flow does not change in these flows, as the results ID Token that is passed to Kaleido as a JWT containing the claims is the same.
Wallet support for OAuth
If you have an embedded signing wallet within your web/mobile application then it will perform nonce management and signing of transactions, before submission of those transactions over a JSON/RPC connection directly to the blockchain. In these cases you will need to update the configuration/code of that wallet to pass the JWT token.
If inspecting the code to make an enhancement to your wallet, look for either:
- The connection of a new Web Socket JSON/RPC connection via a Web3 client library
- Such as
new Web3.providers.WebsocketProvider()inweb3js
- Such as
- The creation of a HTTPS connection via a Web3 client library
- Such as
new Web3.providers.HTTPProvider()inweb3js(or passing a URL directly to theWeb3constructor)
- Such as
If instead you use the Kaleido REST API Gateway to interact with the blockchain, then your web/mobile application will only need to perform standard REST API calls, and you can use your favorite OAuth tutorial and REST API framework to submit your transactions to the chain.
Verification Schemes of JWT Keys
The Blockchain Application Firewall allows JWT tokens to be verified via any of the following public key specifications:
- A
PEMencoded ECDSA public key - A
PEMencoded RSA public key - A JSON Web Key Set (
JWKS) array of keys
Most Identity and Access Management systems with OAuth 2.0 support provide a /.well-known/jwks.json endpoint or similar to
download the JWKS key set.
If you are generating the JWT tokens in your application stack, you can choose the easiest format to export the public key to Kaleido.
Kaleido does not support symmetric encryption keys for JWT tokens. Please use an RSA or ECDSA asymmetric key to generate your JWTs.
Configuring OAuth server public keys
See the OAuth Configurations section of api.kaleido.io
for details of adding JWKS, RSA and ECSDA keys for verification of JWT tokens.
These OAuth resource server configurations can be configured dynamically, without needing to update the BAF configuration
or reset your node. All oauth configurations in the same membership as the blockchain application firewall will be
dynamically configured as public keys to verify JWT tokens.
It might take a short time for new public keys to be authenticated by the blockchain application firewall after they are created (up to 2 mins)
Example configuration
{
  "jwt": {
    "enabled": true,
    "bearer": true,        // Enable via "Authorization: Bearer JWTSTRING" header
    "header": "X-Api-Key", // Enable via "X-Api-Key: JWTSTRING" header
    "query": "apikey",     // Enable via "?apikeys=JWTSTRING" query parameter
    "cookie": "apikey",    // Enable via "apikey=JWTSTRING" cookie
    "mappings": [
      {
        "claims": {"role-set-by-iam": "admin"},
        "ruleset": "admin-rules"
      },
      {
        "claims": {"role-set-by-iam": "user"},
        "ruleset": "user-rules"
      }
    ]
  }
  // ... additional configuration
}
The full schema for the
jwtsection is described in thedetailsof thePOSTtoconfigurationsin api.kaleido.io
