Document Exchange Introduction
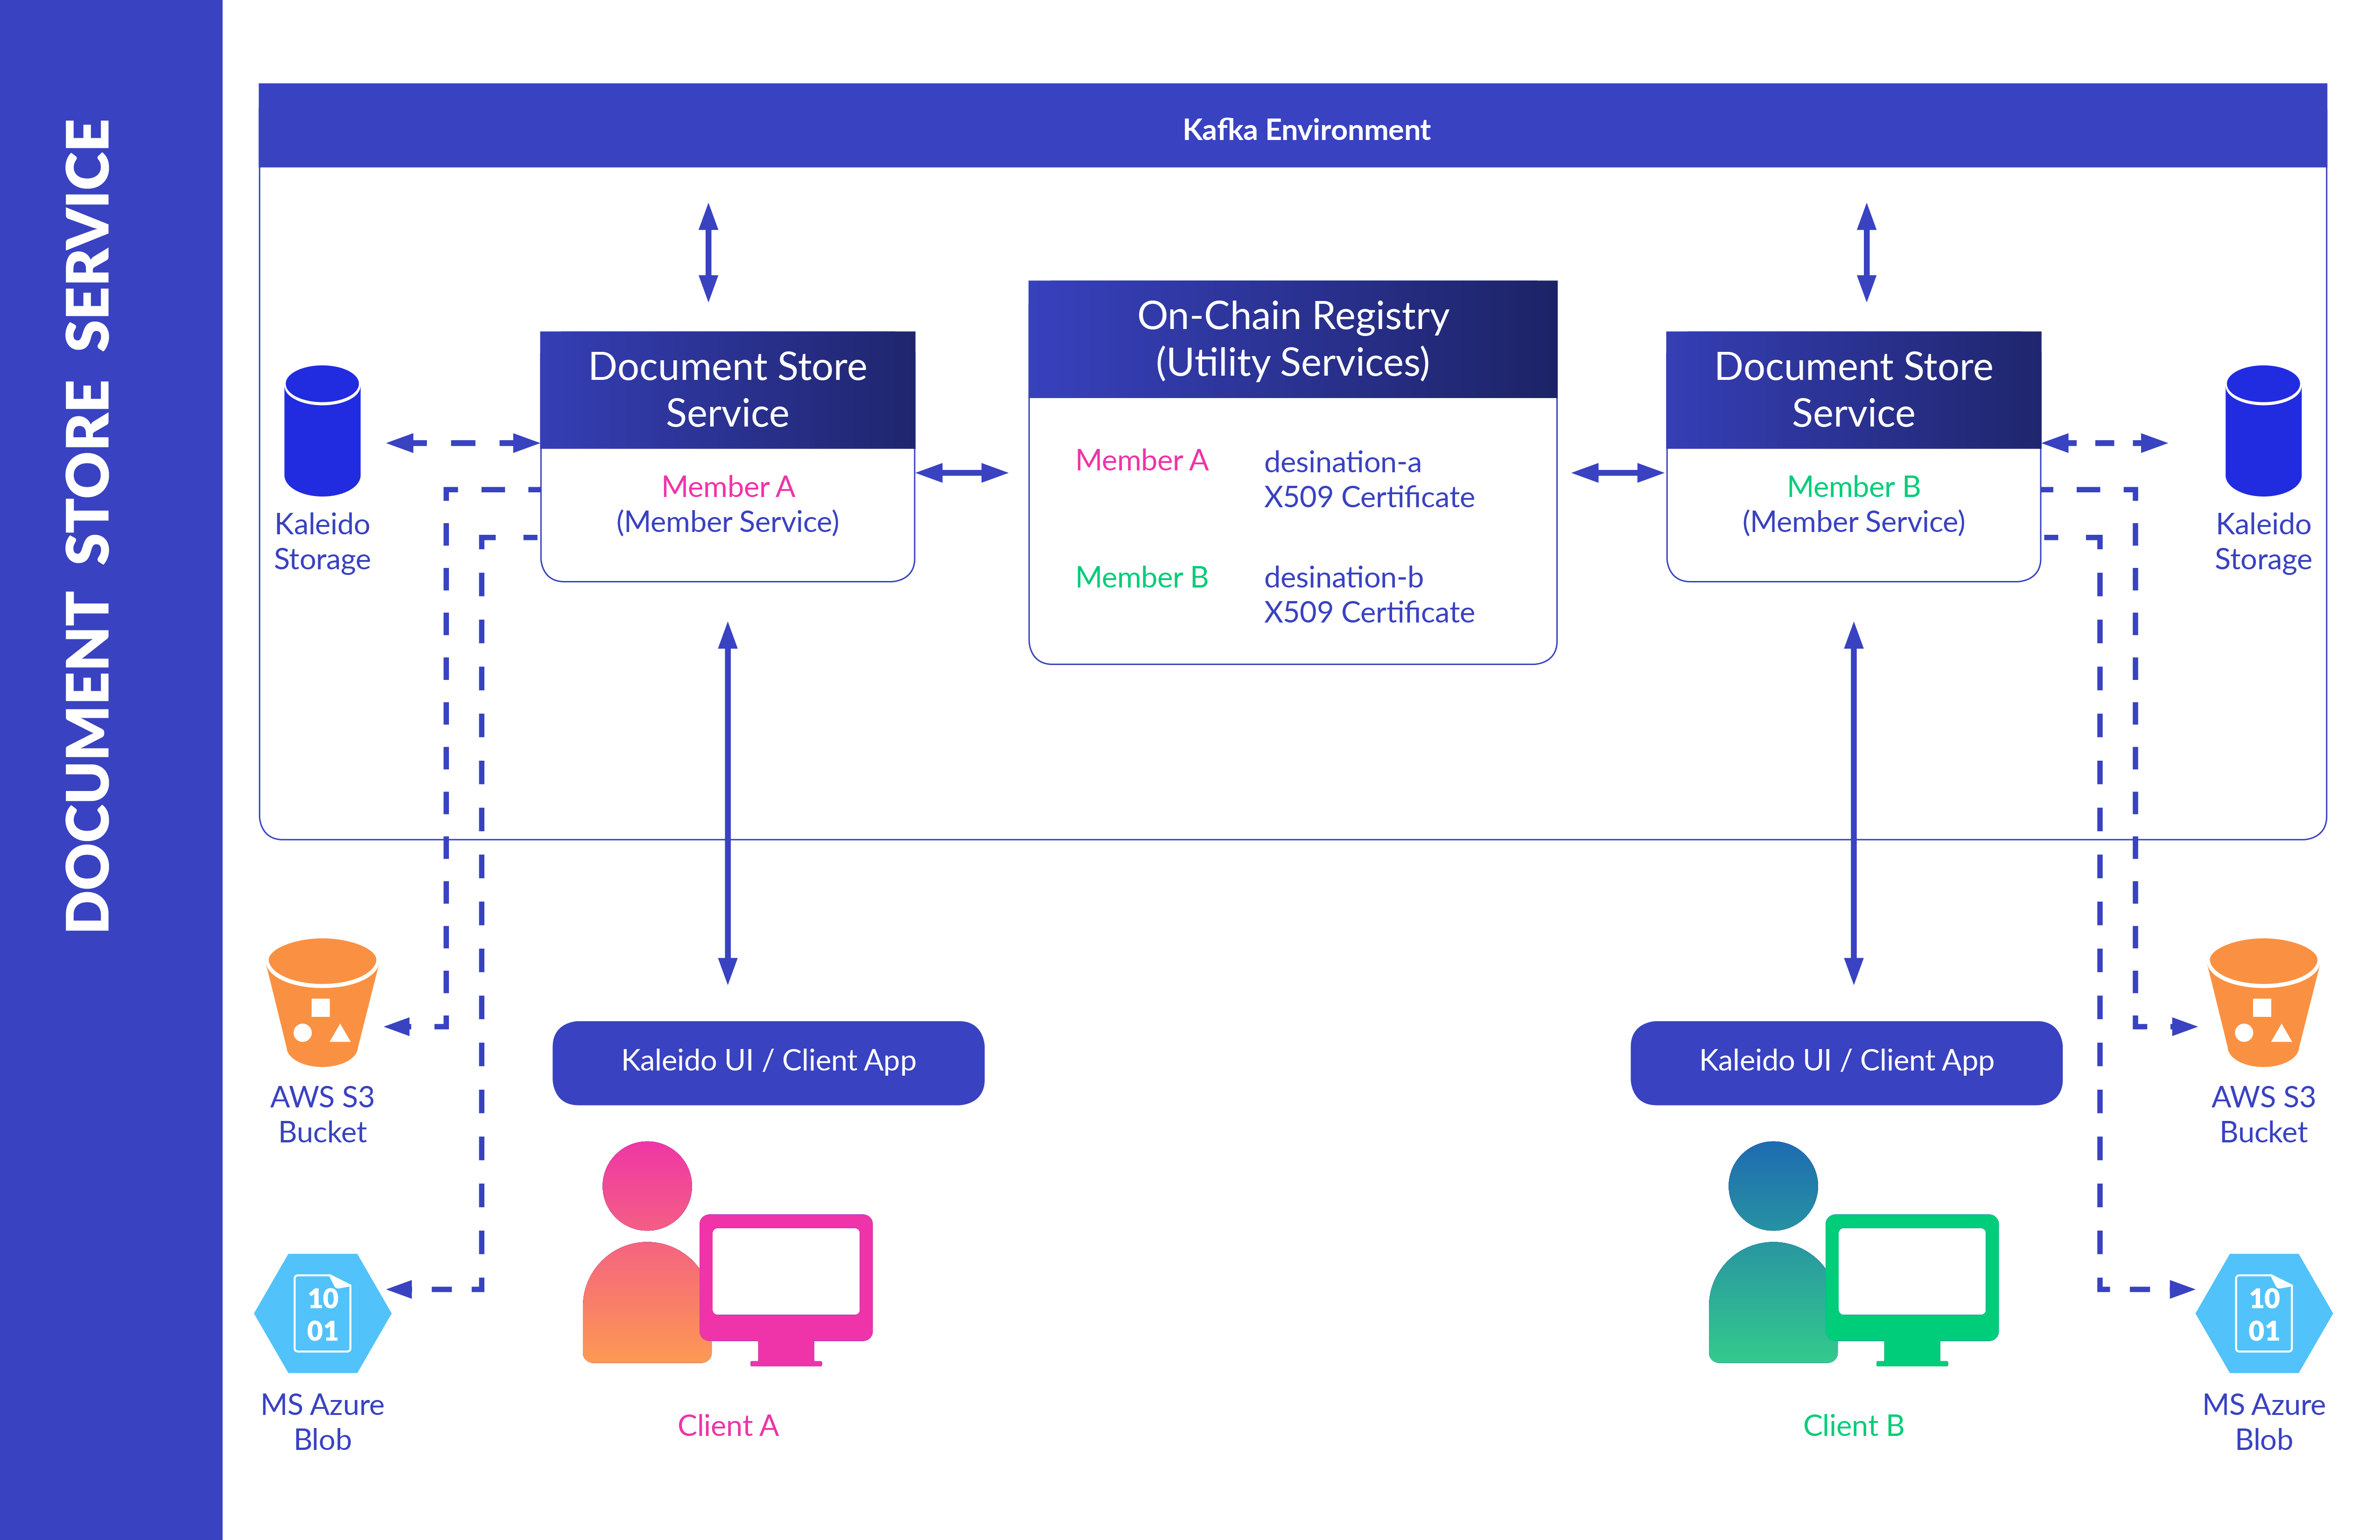
Use the document exchange service to securely upload and transfer files within a Kaleido environment. With blockchains being poorly suited for large payloads and sensitive data such as PII, an ancillary file sharing utility that can exist next to the chain provides immense benefit at both a business and security level. Transactions simply need to reference a file’s hash, rather than dealing with the file contents directly.
Any uploaded or received file can be conveniently organized using intuitive folder structures, and persisted in either Kaleido hosted storage or cloud-delegated and user-controlled services such as AWS S3 Buckets or Azure Blob containers. All transferred data is deterministically hashed, signed, compressed and asymmetrically encrypted in flight using proven public key infrastructure techniques, offering provable guarantees that only the intended recipient can effectively decrypt the packet.
Document exchange leverages the On-Chain Registry service for address look up and certificate functionality, as well as the Kaleido network’s Kafka backbone for high throughput, fault tolerant reliable delivery and transport. Interaction with the service is flexible, with support for the in-console graphical user interface, Kaleido RESTful APIs and socket.io connections for reliable event notification.
Configuring your Document Exchange Runtime
Document exchanges are member-specific services and are only accessible by the owning organization. Use the Kaleido console as the recommended happy path to configure and deploy an instance of the Document Exchange Service. If you wish to use the Kaleido API, skip to the bottom of the page for instructions on programmatically configuring and provisioning the service.
Via the console
- Navigate to the B2B Communications tab under Manage Resources in an existing environment
- Go to Documents and click Add Runtime
- Give the Runtime a name and click Next
- Choose whether you would like to leverage the Kaleido-hosted storage service or integrate with an External Storage solution - either an AWS S3 Bucket or Azure Blob.
Kaleido storage
If you wish to use Kaleido storage, leave the selector on Kaleido Storage and click Next. This will result in your files being stored on a Kaleido-hosted container.
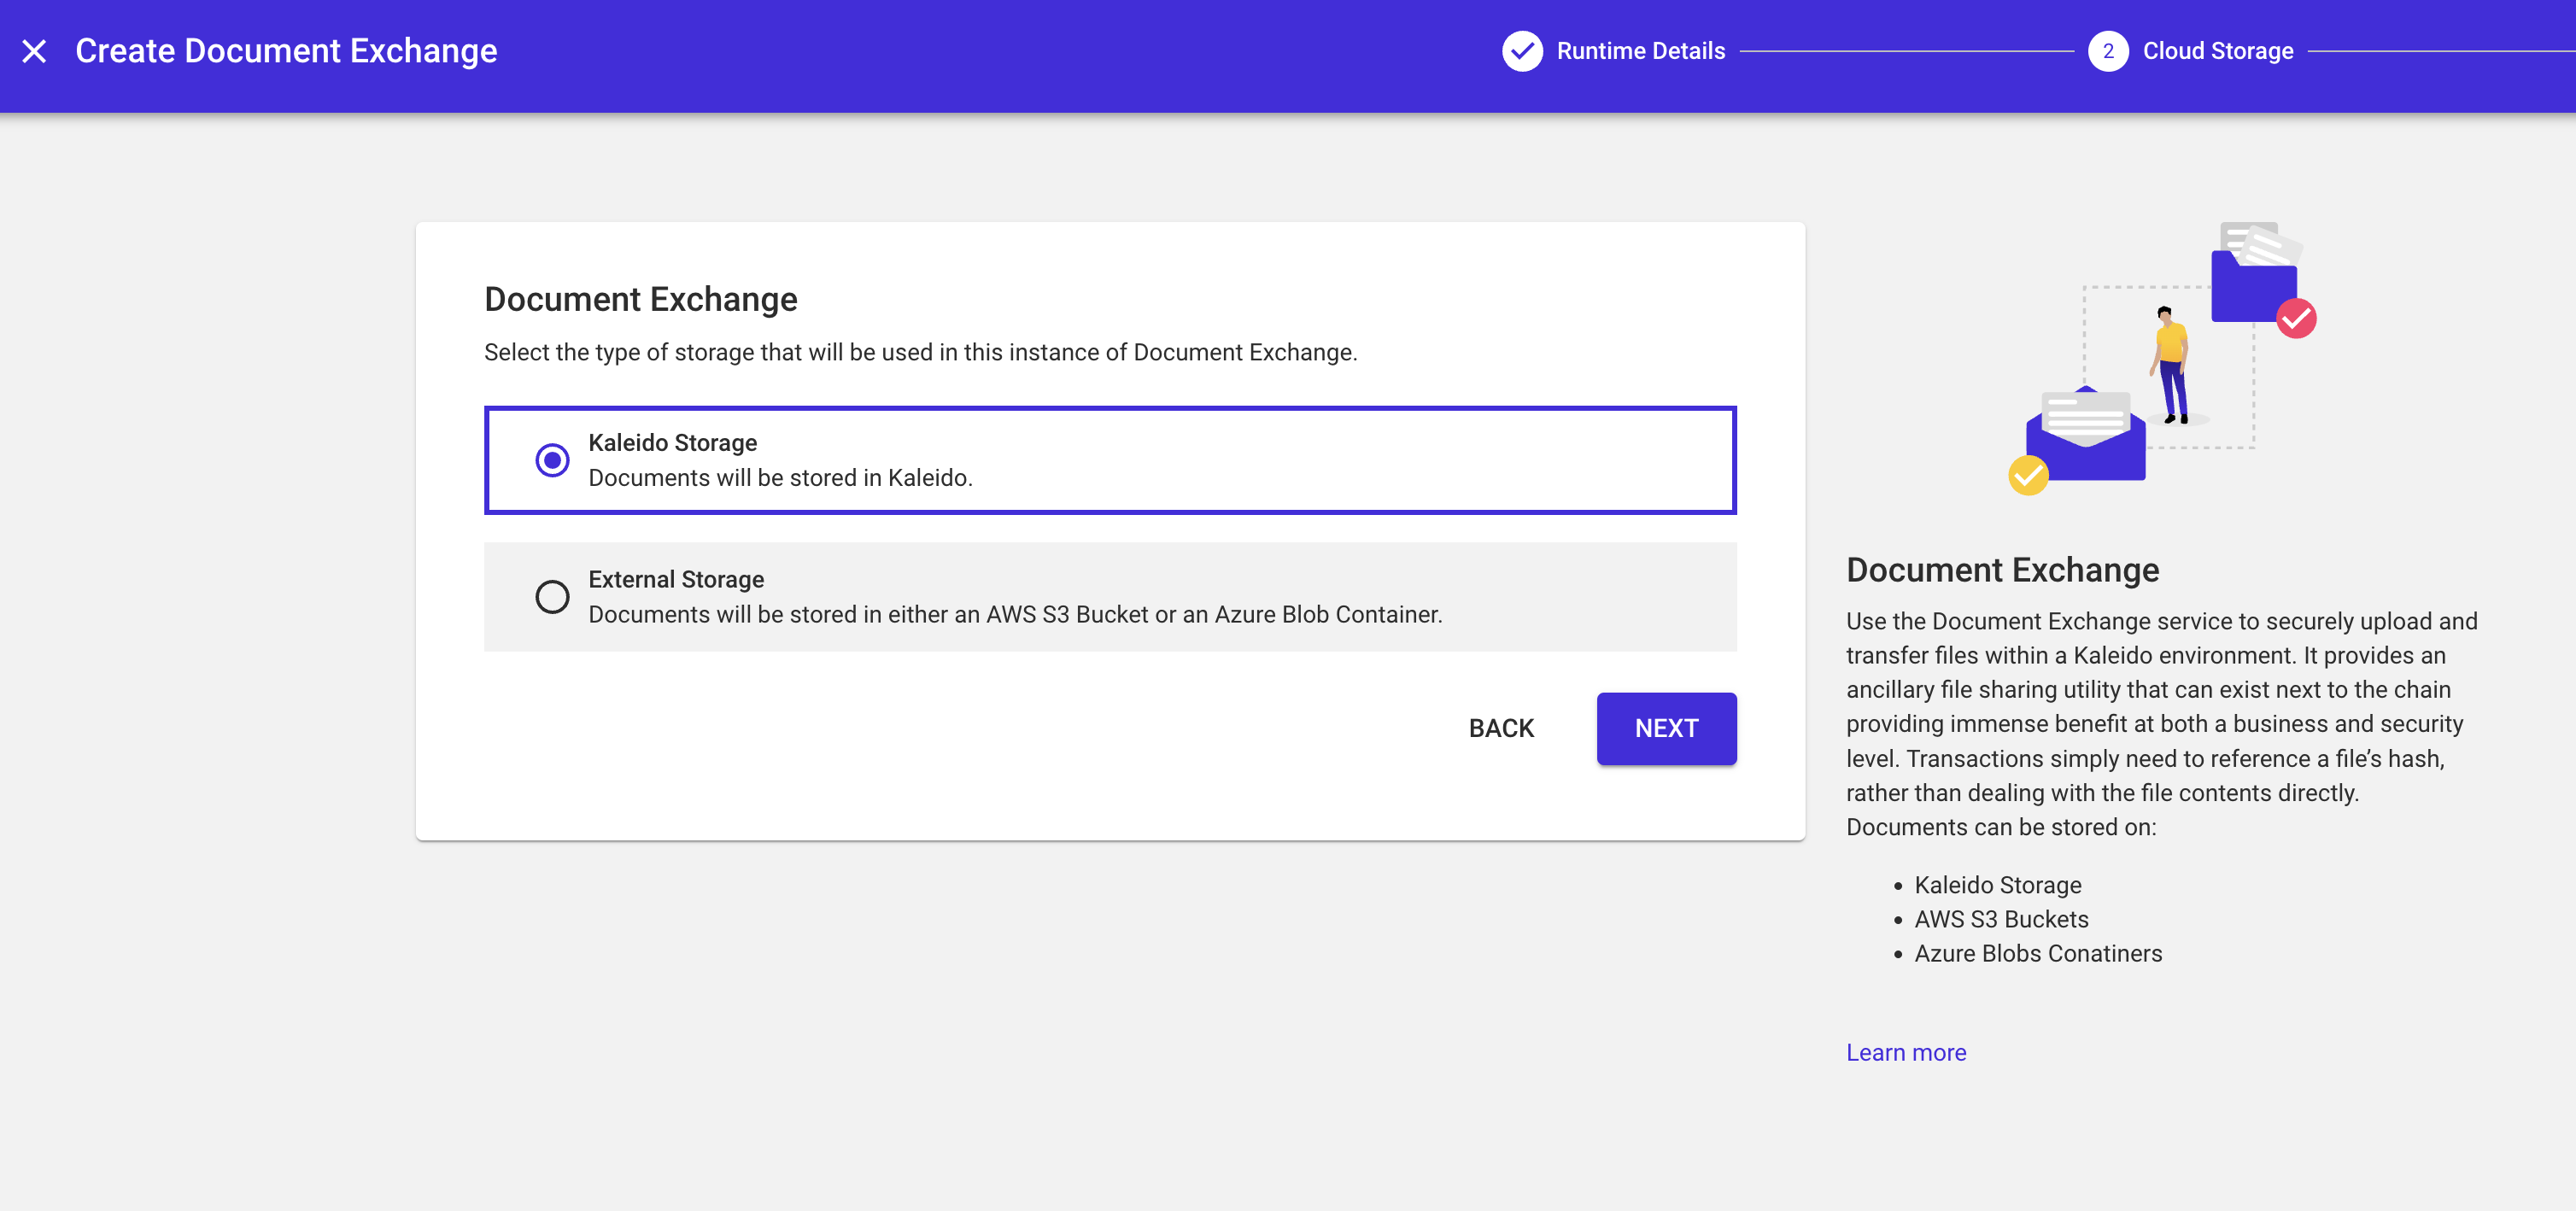
Click Finish to provision the service.
External storage
If you wish to delegate your file storage to an external storage provider, select External Storage and you will be prompted to either select or Create a Storage Configuration.
- For the sake of this walkthrough, select Create to create a new Storage Configuration.
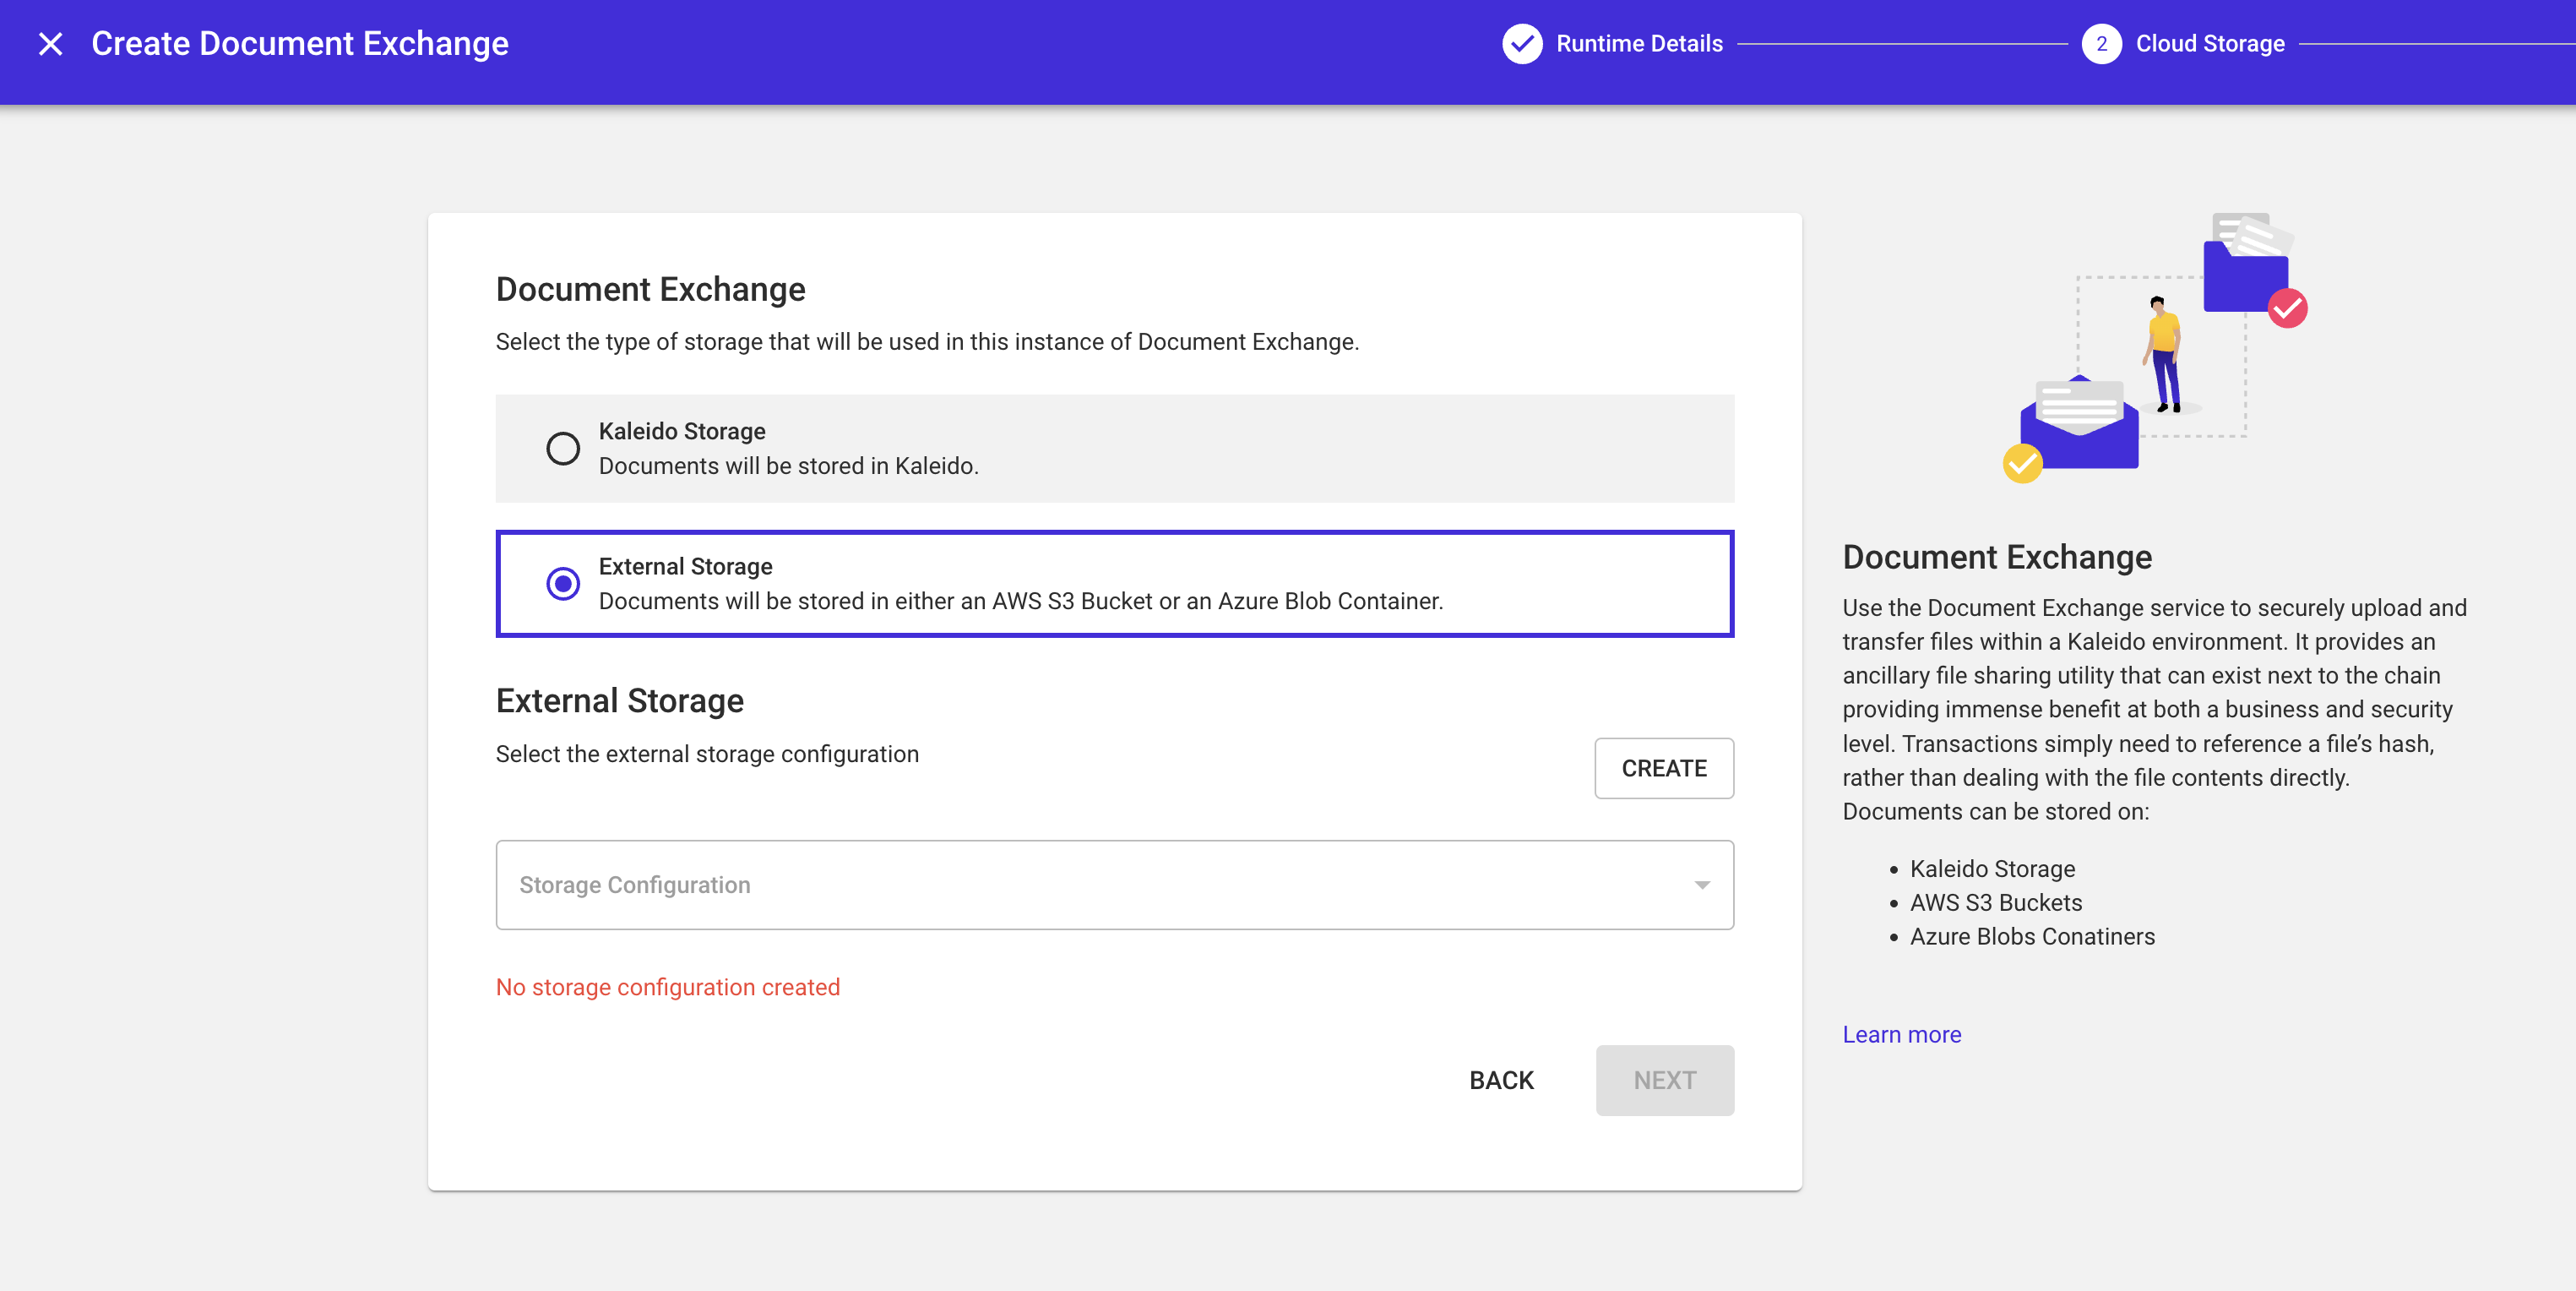
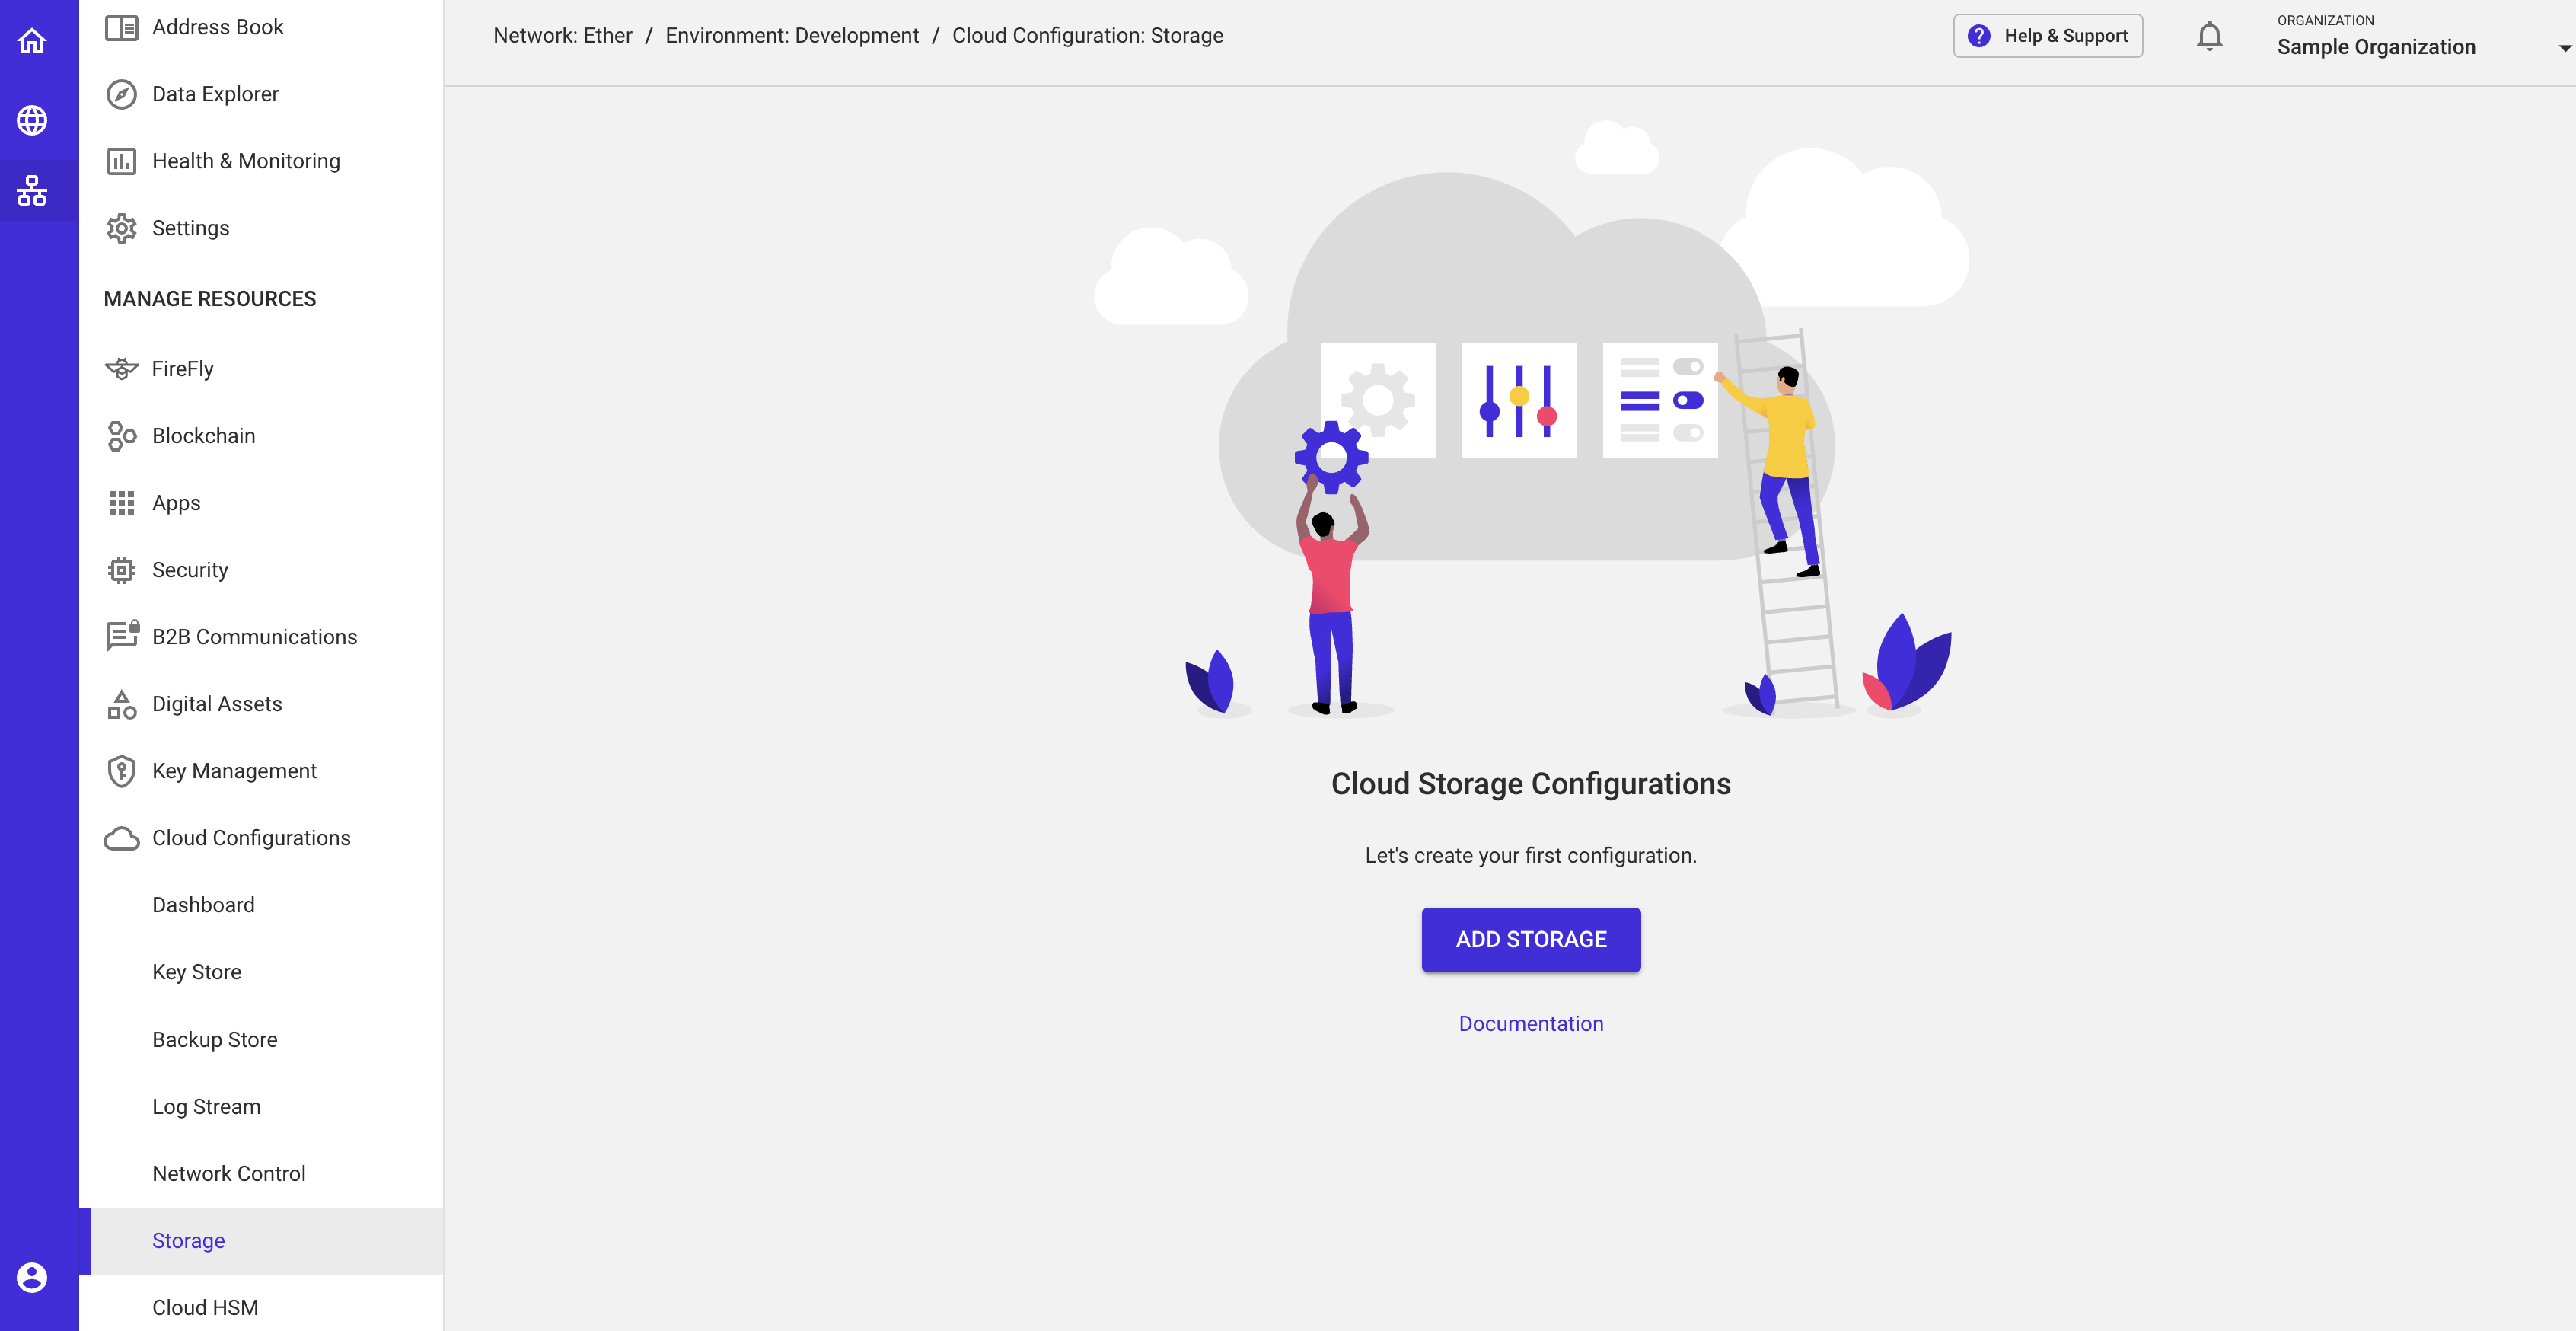
In order to deploy a document exchange instance, we need to ensure that Kaleido can interact appropriately with your external service provider. In the case of document exchange, this is done by setting up a Storage Configuration.
- Select Add Storage on the resulting screen to begin setting up the configuration object for your desired cloud storage instance.
AWS S3 Storage
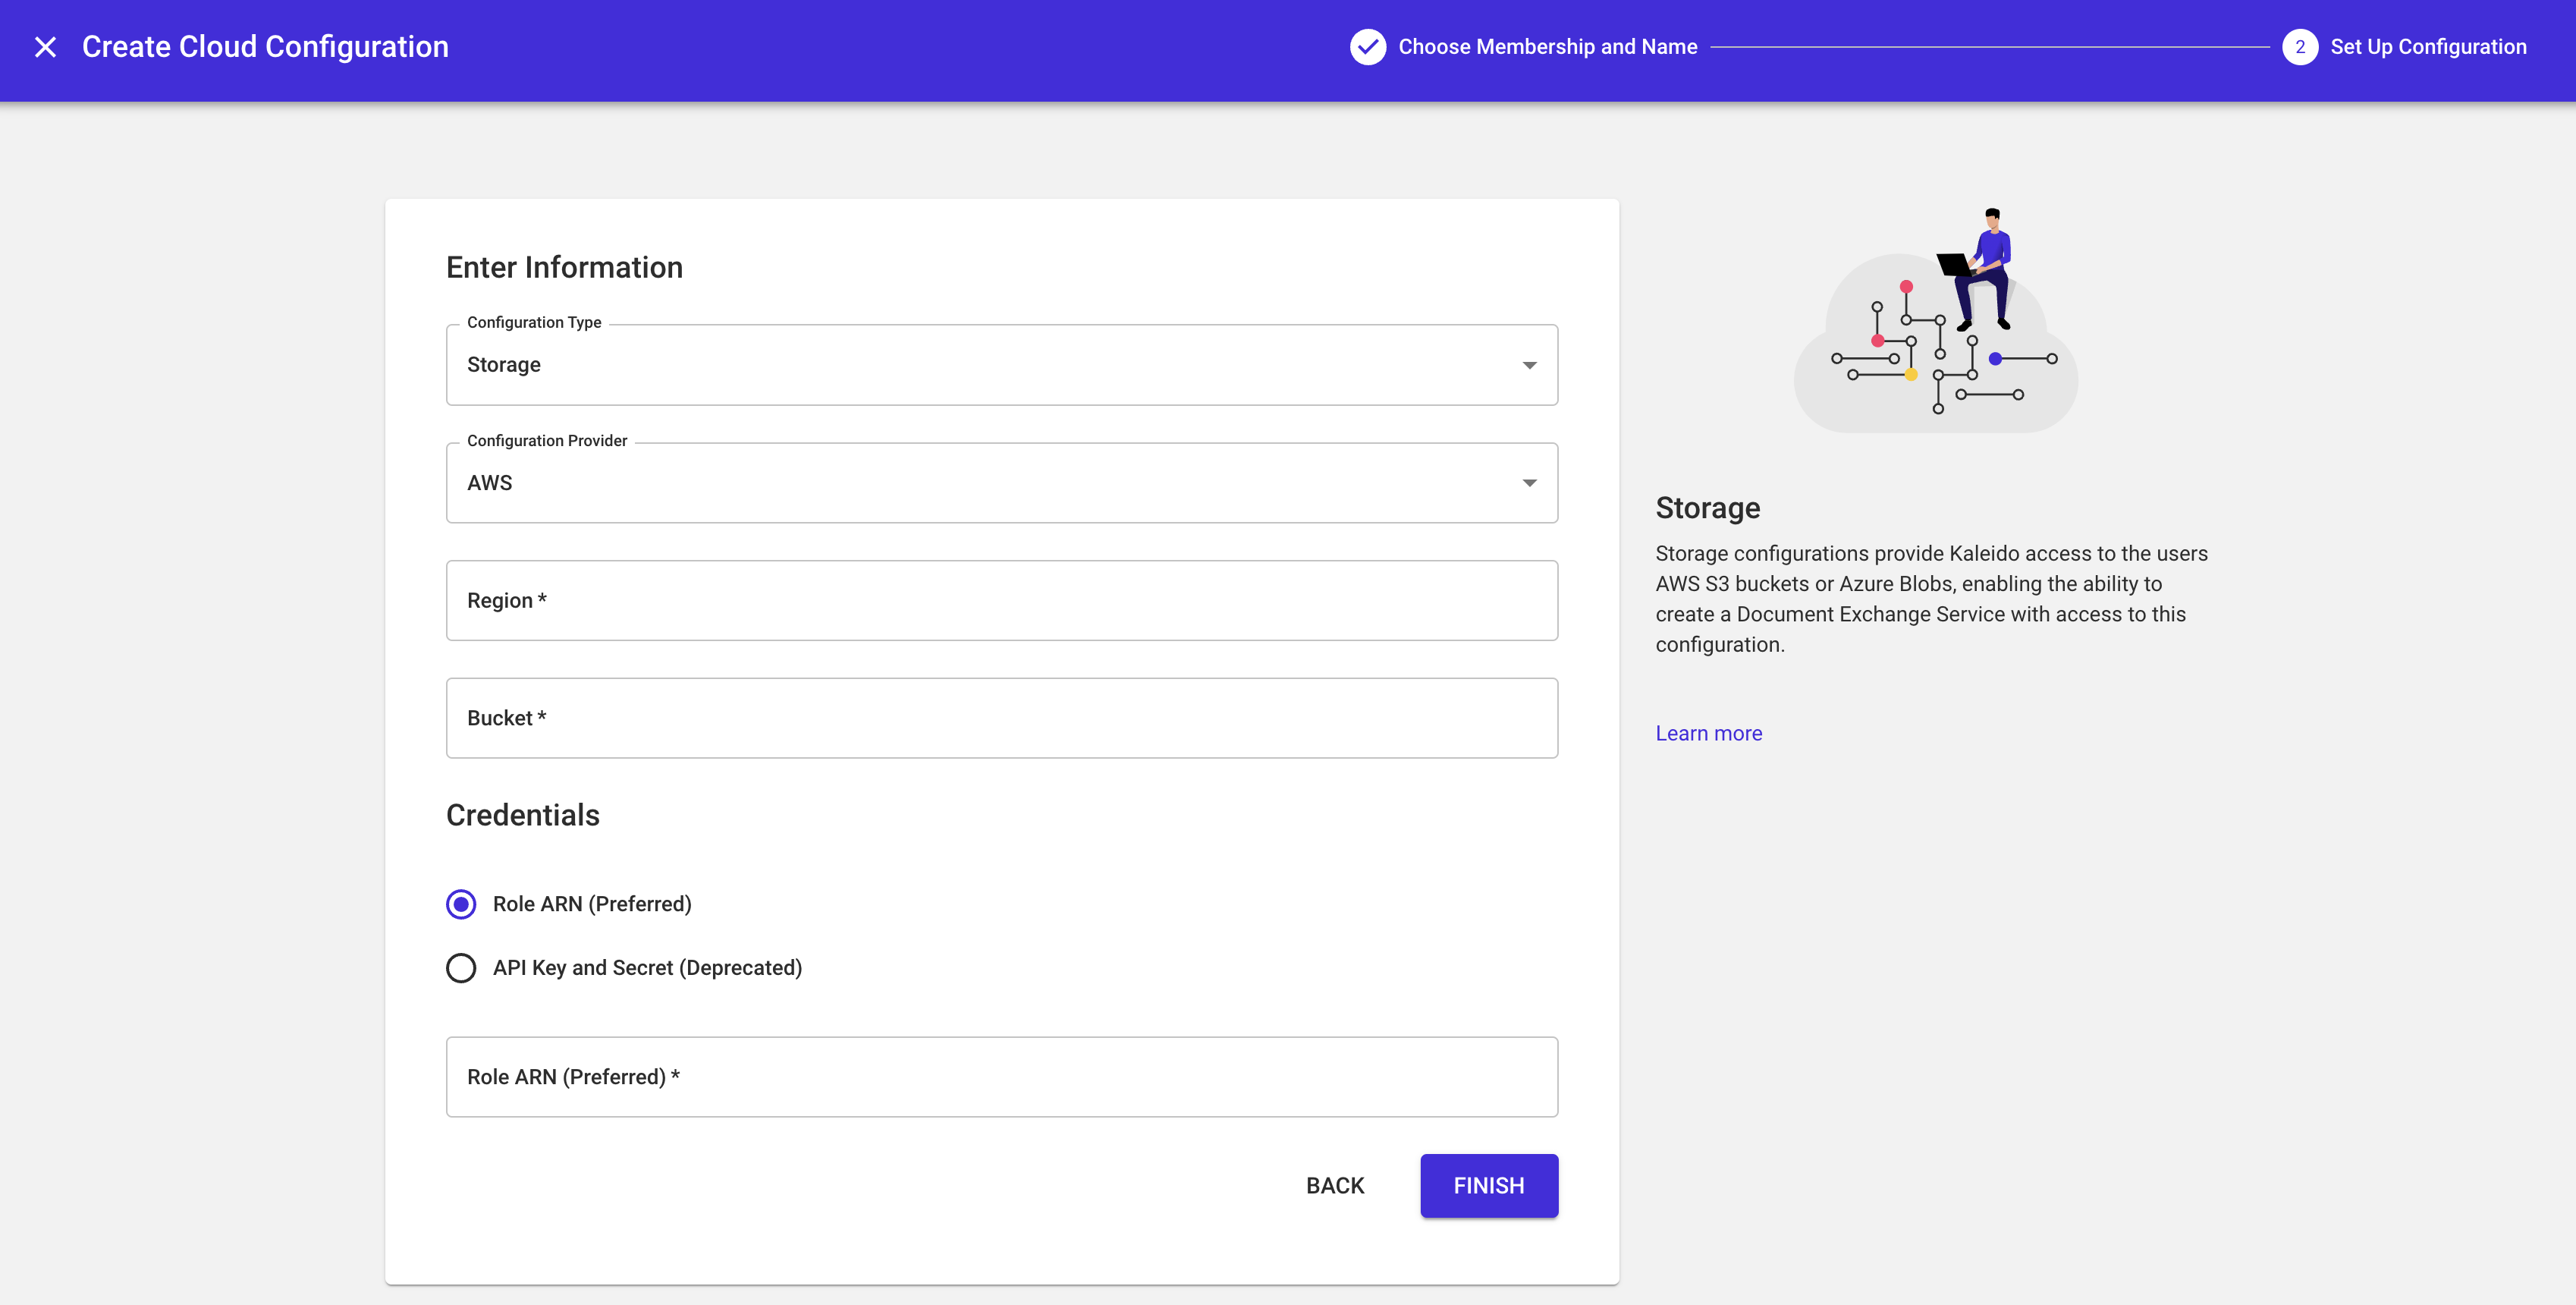
If you are using AWS, you will need to name the storage instance and then select AWS under Configuration Provider. Next, you need to grant Kaleido access to your S3 Bucket by passing it the AWS region, Bucket name and Role ARN associated with the permissions in question. See the next section for guidance on generating the Role ARN.
Configuring IAM Role
To generate the required Role ARN at this stage, you will need to follow these steps:
- Log into the AWS console and navigate to the IAM Service.
- Click the Roles tab in the IAM navigation panel and proceed to Create a New Role.
- Under Trusted entity type, select AWS Account then select Another AWS account and use Kaleido's account ID 271815176711 in the Account ID field.
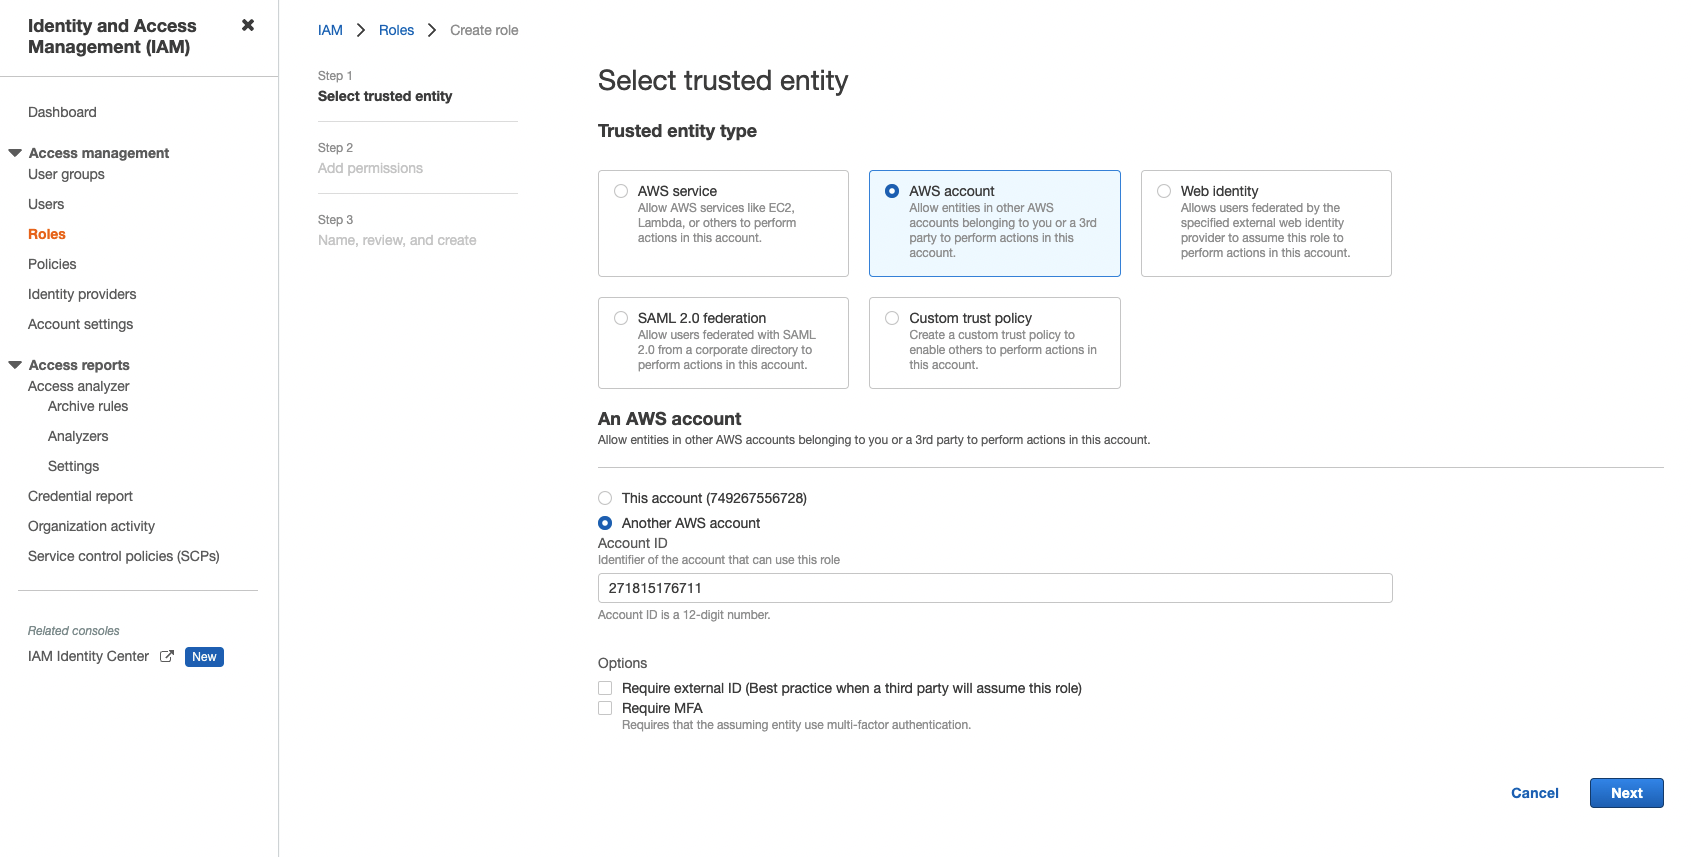
- Skip Permissions, Tags, and finish creating the role by specifying a Role Name.
Configuring S3 Policy
You now need to generate an S3 Policy to grant necesssary access permissions to the role that was just created.
NOTE: Please note that the following steps can and should be customized as per the security requirements of your organization. The following instructions will highlight minimum steps for granting access to one sample S3 bucket for the sake of this walkthrough.
- In the lefthand navigation panel select Policies and click Create Policy at the top right of the screen
- Choose S3 as the Service.
- In the Actions tab, enable Read and Write access.
- In the Resources tab, select Specific and modify the object permissions to include the bucket(s) in question and Any objects within.
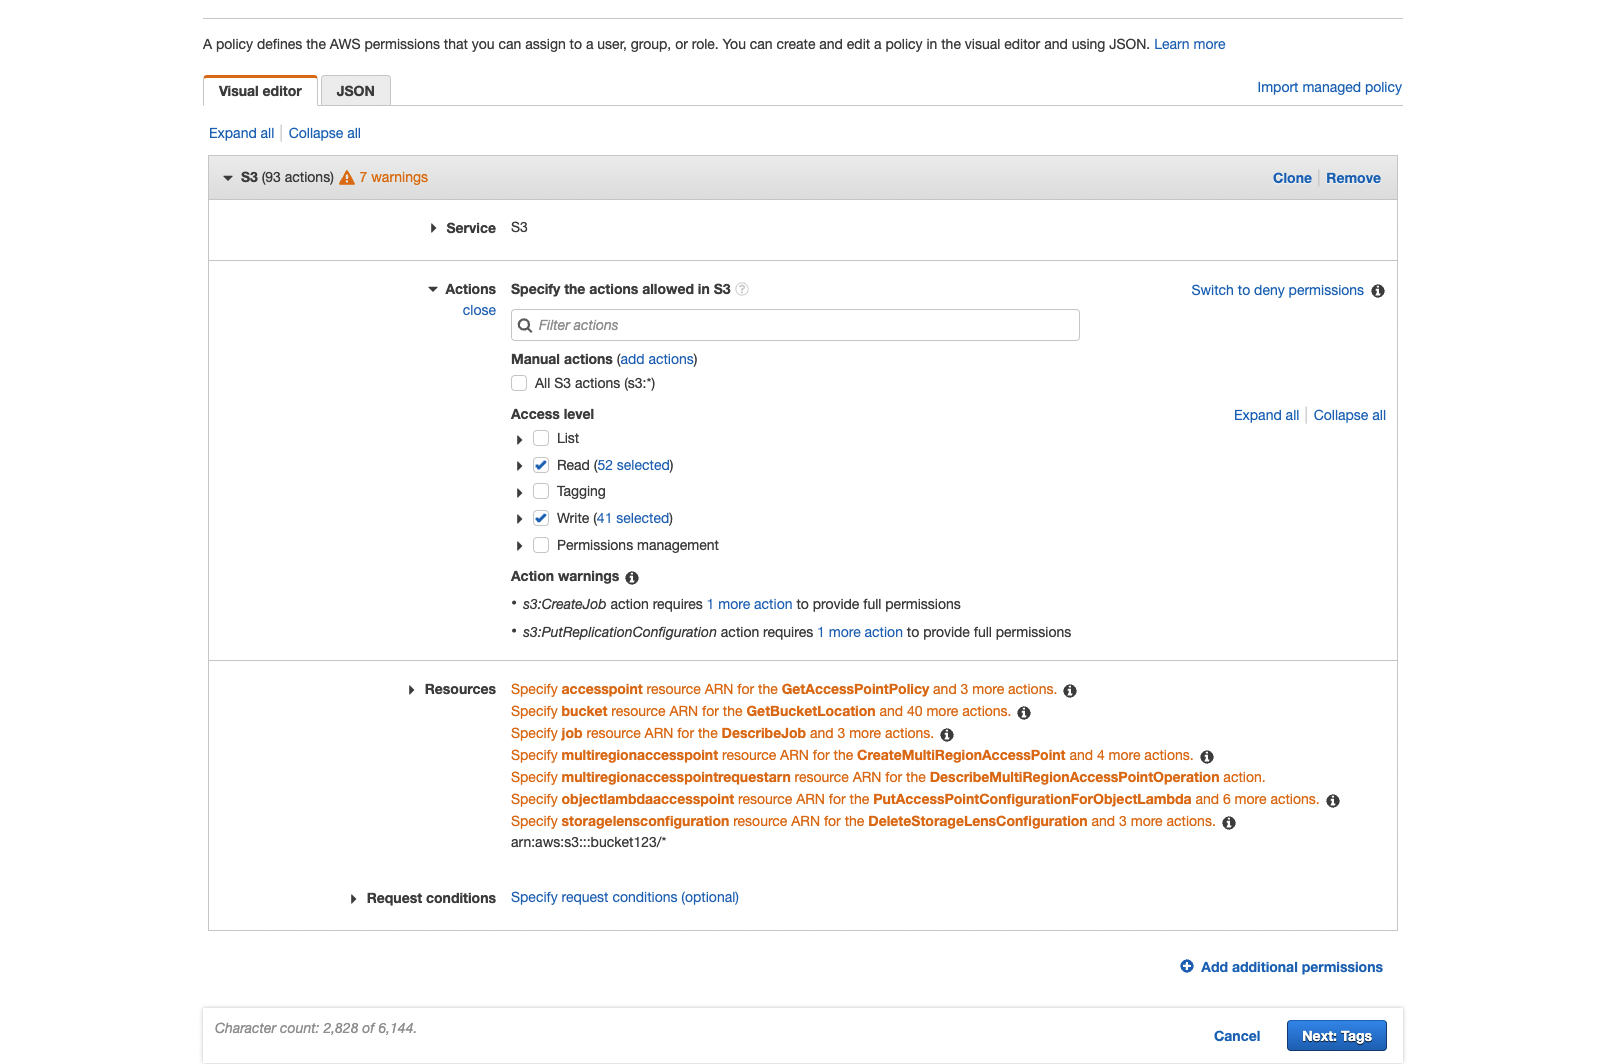
- Create a name for the policy and review it, ensuring that you have provided full read and write access to the bucket(s) in question. Click Create policy to finish.
Now that you have created the S3 Policy, you need to attach it to the Role you previously created.
- Navigate to Roles in the left nav and select your previously created role
- In the top right, select Add permissions and Attach policies
- Select the policy you previously created and click Attach policies in the bottom right
Now you can go to the Role you have created and copy the ARN into the Role ARN field in Kaleido and click Finish to deploy your Cloud Storage instance.
Editing IAM Role's Trust Policy
Once you have created your Cloud Storage instance in Kaleido, the last step is to edit the Trust relationship of your AWS role to guarantee Kaleido's ability to perform actions with the role in question. To do this, you will need to add a string of id's generated by Kaleido into the Trusted entities object in the AWS console.
- First, you will need to assemble an external_id string with a syntax of
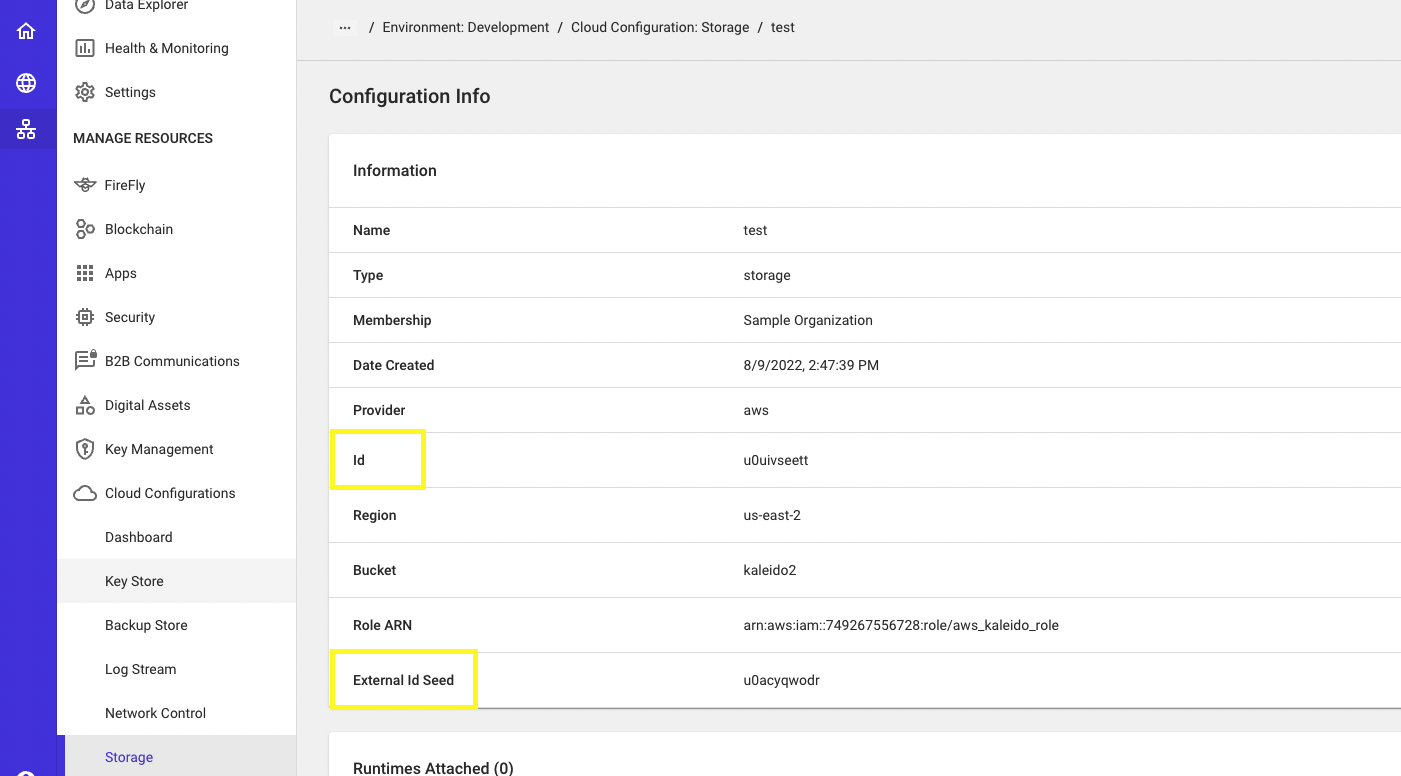
${configuration_id}-${external_id_seed}-external-id, whereconfiguration_idis the ID of the Cloud Storage object andexternal_id_seedis the External ID Seed of the Cloud Storage configuration object. Both values are highlighted in the image below:
For example, if the "id" of the instance is
u0jj4apxhwand "external_id_seed" isu0f5drkxrb, then the fully assembled external_id string would beu0jj4apxhw-u0f5drkxrb-external-id.
- You will then navigate to your AWS role and select Trust relationships and click Edit trust policy in the top right.
- In the resulting JSON config, you will need to paste the following into the 'Condition' parameter and click Update policy.
Finally you are ready to deploy your Document Exchange instance in Kaleido.
- Navigate to B2B Communications and click Add Runtime next to Documents
- Name your Document Exchange instance, click External Storage and select the name of the Storage Configuration you just finished setting up.
- Select a size for the runtime and click Finish to deploy.
Azure Blob Storage
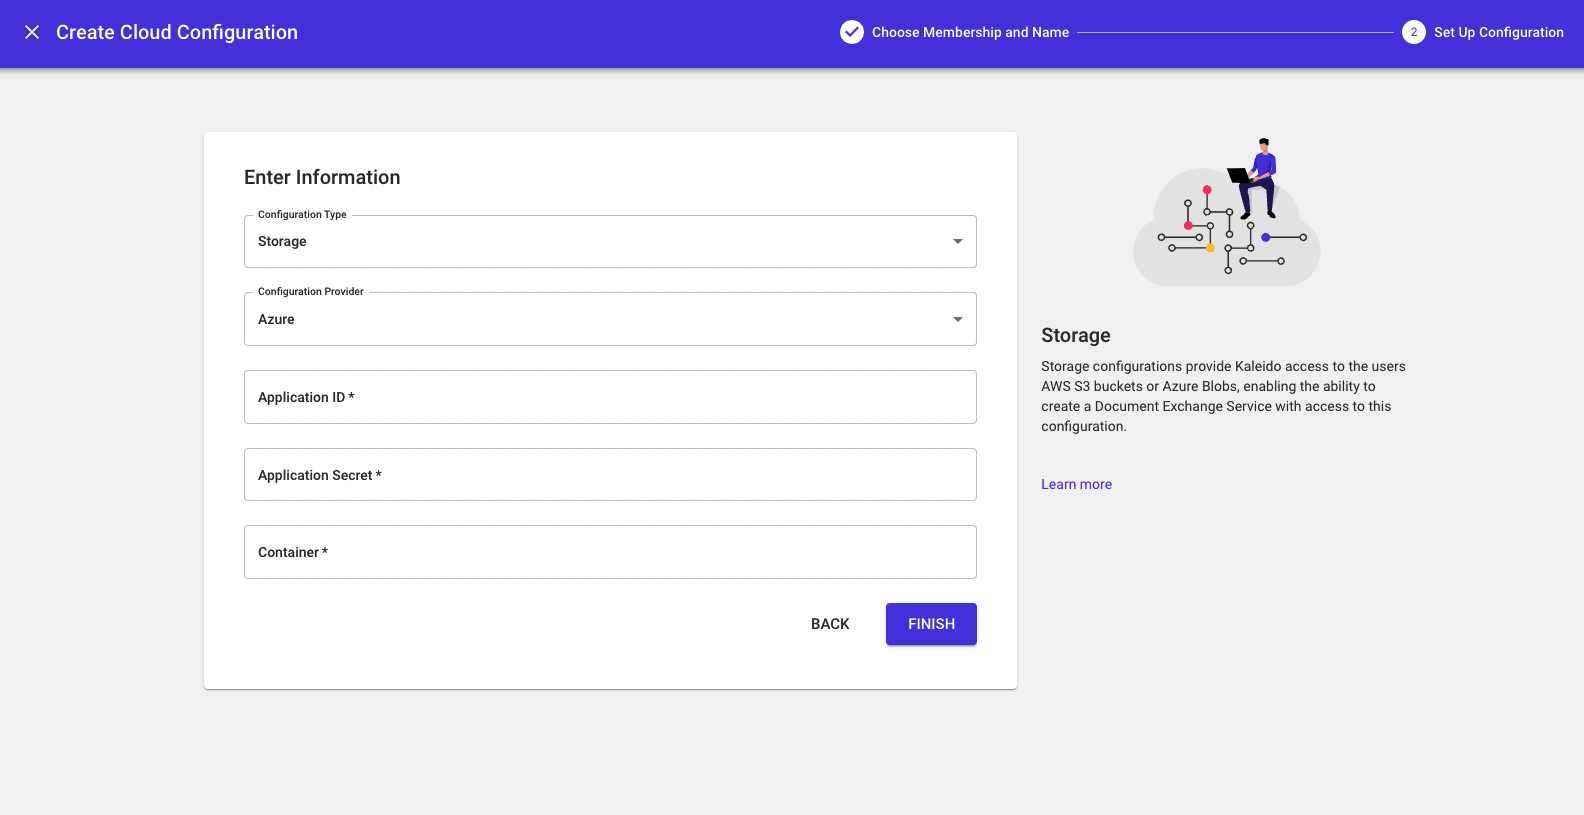
If you wish to delegate your file storage to an Azure Blob container, select Azure under Configuration Provider.
The configuration parameters are defined as follows:
- Application ID
- Application Secret
- Container
Click Finish to deploy the Cloud Storage instance.
Finally you are ready to deploy your Document Exchange instance in Kaleido.
- Navigate to B2B Communications and click Add Runtime next to Documents
- Name your Document Exchange instance, click External Storage and select the name of the Storage Configuration you just finished setting up.
- Select a size for the runtime and click Finish to deploy.
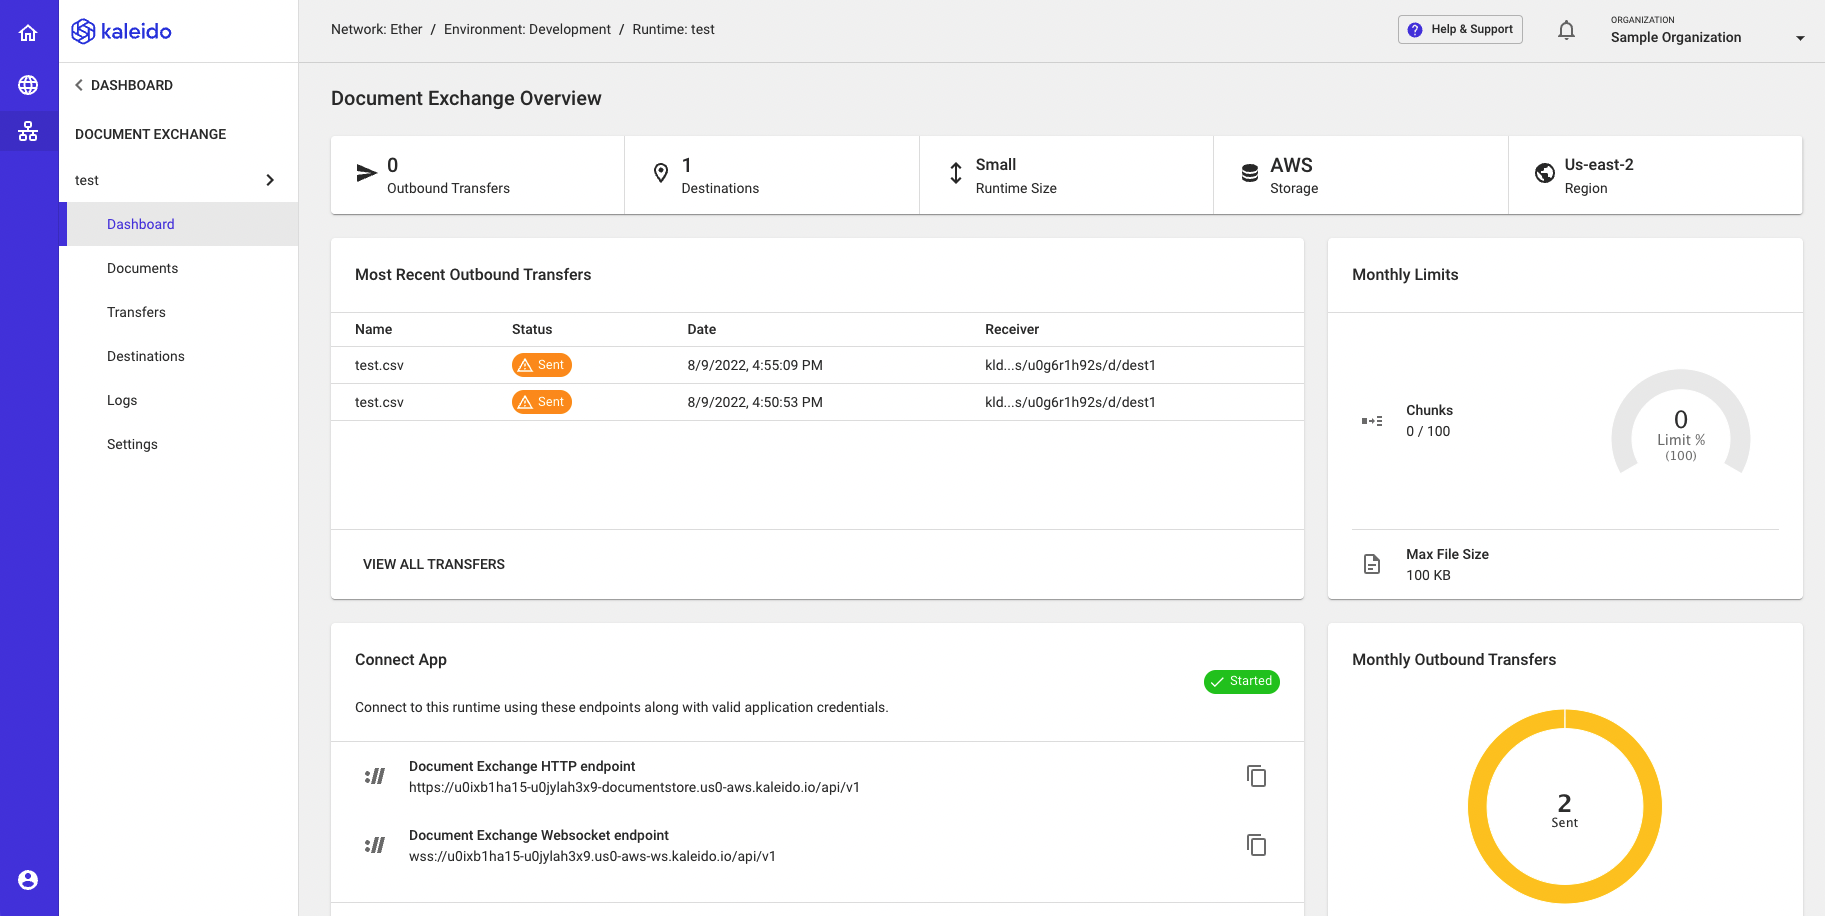
Deployed Instances
Instances of the Document Exchange Service can be accessed at any time underneath the B2B Communications tab by clicking on the runtime in question. From here, you will be directed towards an interface containing triggers for the upload and exchange of files. You can also track usage and contents from the dashboard.
Via the API
NOTE: The following deployment approach assumes a strong understanding of the Kaleido APIs. Please refer to the Kaleido Resource Model for object relationships, the API 101 topic for sample CRUD operations and api.kaleido.io for detailed descriptions of the various endpoints and routes.
The following examples make use of cURL and assume that the following environment variables have been properly set:
export APIURL="https://console.kaleido.io/api/v1"
export APIKEY="YOUR_API_KEY"
export HDR_AUTH="Authorization: Bearer $APIKEY"
export HDR_CT="Content-Type: application/json"
If you are targeting an environment outside of the US or on Azure, make sure to modify your URL
accordingly. The ap qualifier resolves to Sydney, while ko resolves to Seoul. The us1
qualifier designates an environment configured with Azure US West as the home region. For
multi-region environments, the home region is determined by the location of the first deployed node:
export APIURL="https://console-eu.kaleido.io/api/v1"
export APIURL="https://console-ap.kaleido.io/api/v1"
export APIURL="https://console-ko.kaleido.io/api/v1"
export APIURL="https://console-us1.kaleido.io/api/v1"
Kaleido-hosted storage
Use the POST method against the /services endpoint specifying the consortia and environment IDs
in the path, and supplying the membership ID, a service type of "documentstore" and an arbitrary
name for the service in the body of the call. For example:
# replace the placeholder values with your actual Kaleido resource IDs
curl -X POST -H "$HDR_AUTH" -H "$HDR_CT" "$APIURL/consortia/{consortia_id}/environments/{environment_id}/services" -d '{"membership_id":"{membership_id}", "service":"documentstore", "name":"Company ABC - documentstore"}' | jq
Cloud-delegated storage
If electing for cloud-delegated storage, two separate calls are required to provision and configure
the service. The first is a call to the /configurations endpoint. This call ingests the
configuration parameters - outlined in the corresponding cloud sections above - for your desired
cloud storage (AWS or Azure) and returns a configuration ID. The second call targets the
/services endpoint and requires the previously generated configuration ID to be supplied within
the body of the call.
Use the POST method to generate the storage configuration object for the service and optionally
format the output using jq. This example command uses Azure as the cloud provider.
# replace the placeholders with the actual values for your Kaleido and Azure resources
curl -X POST -H "$HDR_AUTH" -H "$HDR_CT" "$APIURL/consortia/{consortia_id}/environments/{environment_id}/configurations" -d '{"name":"exampleconfig", "type":"storage", "membership_id":"{membership_id}", "details":{"provider":"azure", "bucket":"CONTAINER_NAME", "user_id":"STORAGE_ACCOUNT", "user_secret":"ACCOUNT_ACCESS_KEY"}}' | jq
This will return you a JSON payload containing the service ID which will be used in the forthcoming call.
Next, use the POST method once again to provision the Document Store Service. Note that the
previously generated configuration ID is passed as a nested argument to the "details" parameter in
the body of this call.
# replace the placeholders with the actual values for your Kaleido resources
curl -X POST -H "$HDR_AUTH" -H "$HDR_CT" "$APIURL/consortia/{consortia_id}/environments/{environment_id}/services" -d '{"name":"Company ABC - documentstore", "service":"documentstore", "membership_id":"{membership_id}", "details":{"storage_id":"{configuration_id}"}}' | jq
The provision call will return you the service details for your newly generated Document Store
Service. Lastly, you can optionally call a GET on the /services endpoint and specify the
service id in the route to view the status of your service. For example:
# replace the placeholders with the actual values for your Kaleido resources
curl -X GET -H "$HDR_AUTH" -H "$HDR_CT" "$APIURL/consortia/{consortia_id}/environments/{environment_id}/services/{service_id}" | jq
Resource Sizing
The following table serves to outline the available resource limitations based on the provisioned Document Storage service size.
| Starter | Small | Medium | Large | |
|---|---|---|---|---|
| vCPU | 0.3 | 0.3 | 0.5 | 1 |
| Memory | 256 Mi | 512 Mi | 512 Mi | 1024 Mi |
| Max Docs | 100 | Unlimited | Unlimited | Unlimited |
| Max Document Size | 100 KB | 100 KB | 50 MB | 10 GB |
| Replicas | 2 | 2 | 2 | 2 |
| Chunk transfer per Month | 100 | 100 | 1000 | Unlimited |
