Truffle Suite
Truffle is the most popular development tooling for Ethereum programmers. Easily deploy smart contracts and communicate with their underlying state without heavy client side programming. An especially useful library for the testing and iteration of Ethereum smart contracts.
Connecting with Truffle
Kaleido environments are provisioned with two pre-configured Truffle boxes for the easy construction and deployment of a basic decentralized application. Truffle is a particularly useful development framework, as it abstracts away many of the web3 and Ethereum complexities that typically exist with blockchain app development and allows for rapid lightweight testing and iteration. This is a great way to get started without needing deep expertise around client libraries and JSON/RPC APIs.
The first box truffle-kaleido-box compiles and instantiates the simple storage smart contract. Simple storage uses a single global variable – storedData – specified as an unsigned integer and a single method – set – for state updates.
It is accompanied by the drizzle-kaleido-box which extends the initial library with a React and Redux front end for secure interaction with your Kaleido environment. Follow along and in a few minutes you can have your own fully-fledged dApp. Let’s get started…
Getting Started
- Navigate to an active environment with a running node. If you haven’t created a Kaleido environment before, follow the Quick Start instructions to build your first blockchain.
- Click the “Connect to your nodes” banner at the top of your environment screen, or use the dropdown window next to a node and select “Connect"
If you've already connected before, you will not see the banner. Just click into a node you wish to connect to and then click "+ Connect"

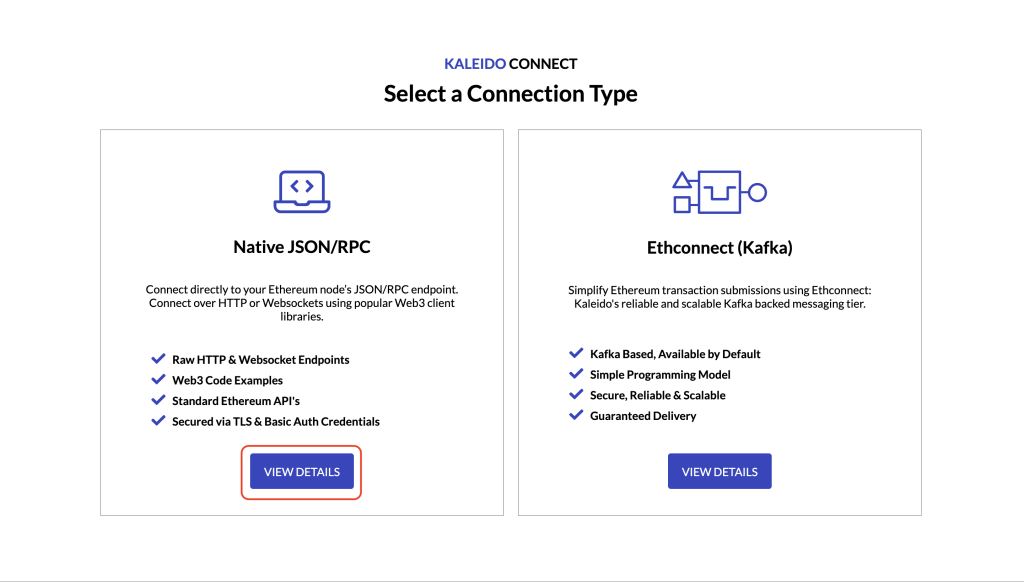
- This will take you to the Kaleido Connect panel. Select VIEW DETAILS beneath the Native JSON/RPC window.

-
If you have not generated any application credentials, select GENERATE NEW. If you wish to leverage existing application credentials, paste in the user password combination and click SUBMIT. If you need to create new credentials, click REGENERATE.
-
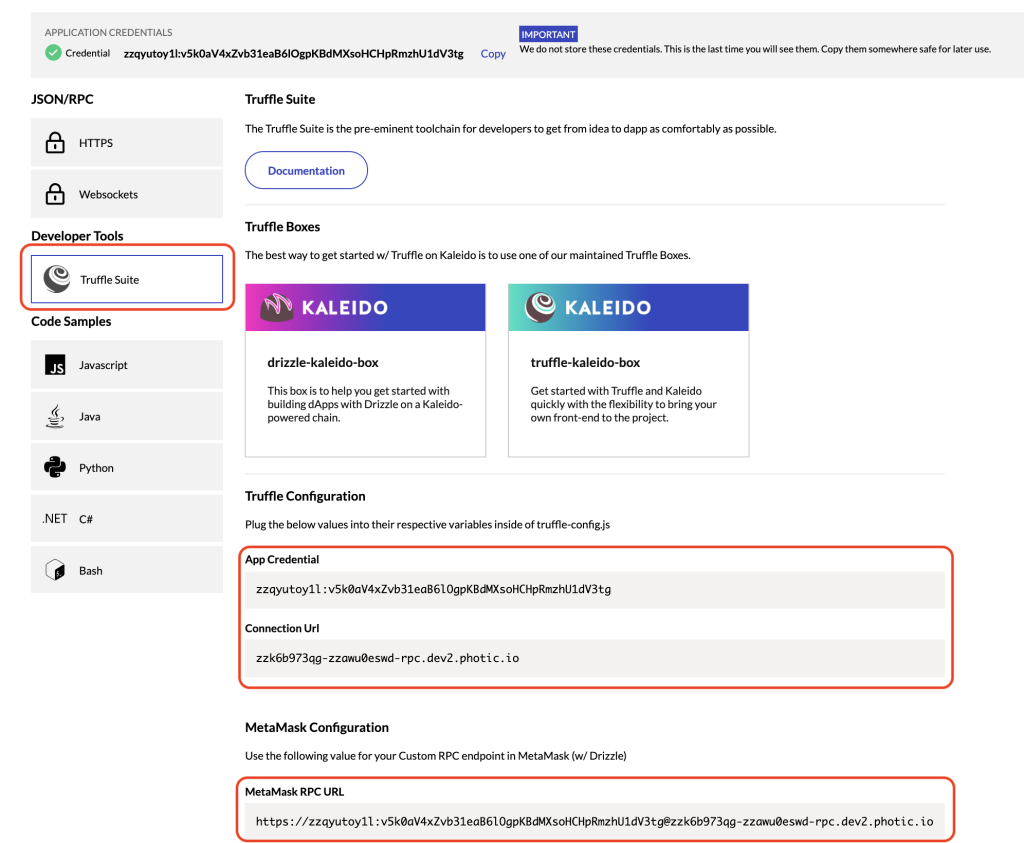
This will take you to the baseline connection screen for JSON/RPC web3 calls. On the lefthand navigation, select Truffle Suite under the Developer Tools section.

Take note of the three configuration strings. The App Credential and Connection URL are used for the truffle-kaleido-box javascript configuration. These are passed to a standard web3 HTTPS Provider API and allow for an authenticated connection to the Kaleido chain. The MetaMask RPC URL is the fully qualified string injected with the application credentials and is used by the drizzle-kaleido-box to authenticate with Kaleido.
Using the Kaleido Truffle Box
- Click on the
truffle-kaleido-boxicon to begin. - Follow the README instructions to download truffle and unbox the first package.
- Proceed with the
compile,testandmigratecommands to ensure expected behavior. - Next, edit the
truffle-config.jsconfiguration file to include the App Credential and Connection URL strings from the Kaleido console. - Replace the
yourappcredandnodeConnectionURLplaceholders with the exact values displayed on the Truffle Suite screen in the Kaleido Connect console. - For example, using the sample configuration parameters displayed above, a properly formatted javascript file would be:
const path = require("path");
var Web3 = require("web3");

module.exports = {
    // See <http://truffleframework.com/docs/advanced/configuration>
    // to customize your Truffle configuration!
    networks: {
        development: {
            provider: () => {
                const appCred =
                    "izzqyutoy1l:v5k0aV4xZvb31eaB6lOgpKBdMXsoHCHpRmzhU1dV3tg"; // from application credential widget
                const connectionURL =
                    "zzk6b973qg-zzawu0eswd-rpc.us0-aws.kaleido.io"; // without protocol (https://)
                return new Web3.providers.HttpProvider(
                    `https://${appCred}@${connectionURL}`,
                    100000
                );
            },
            network_id: "*", // Match any network id
            gasPrice: 0,
            gas: 4500000,
            /* type: 'quorum' // Use this property for Quorum environments */
        },
    },
};
- Now you can use the
truffle migratecommand to instantiate the smart contracts on the blockchain. Note that truffle will deploy a Migrations smart contract by default on the first migrate call, which maintains a historical record for all migrations on your chain. To learn more about migrations, please refer to the formal Truffle Documentation. - Check out your transactions by viewing the Block Explorer in your environment dashboard. You should see four transactions in total. Two for contract creation and two targeting the migrations smart contract.
Using the Drizzle Front End
- Click on the
drizzle-kaleido-boxicon to begin. The drizzle box contains the exact same content as the truffle kaleido box, along with an additional/appdirectory containing the front-end React componentry. - Follow the README instructions to download and unbox the drizzle library. Note this will take 1-2 minutes to complete.
- Edit the
truffle-config.jsfile and replace theyourappcredandnodeConnectionURLplaceholders with the exact values displayed on the Truffle Suite screen in the Kaleido Connect console. This process is identical to the previous one. - Once again, use the truffle migrate command to instantiate the smart contracts on the network. DO NOT FORGET THIS STEP. The react app needs to locate the Simple Storage contract upon start up.
- The React app makes use of the MetaMask browser wallet for Ethereum transaction signing when updating the state of Simple Storage. If you do not have the extension installed, you can do so here.
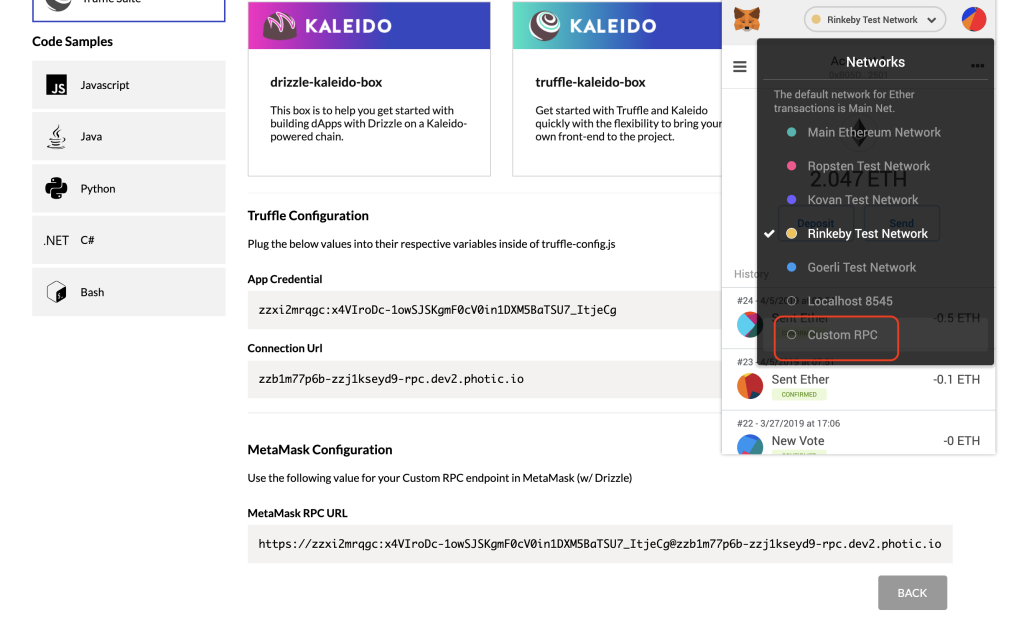
- Click the Network dropdown window within MetaMask and select the Custom RPC option.

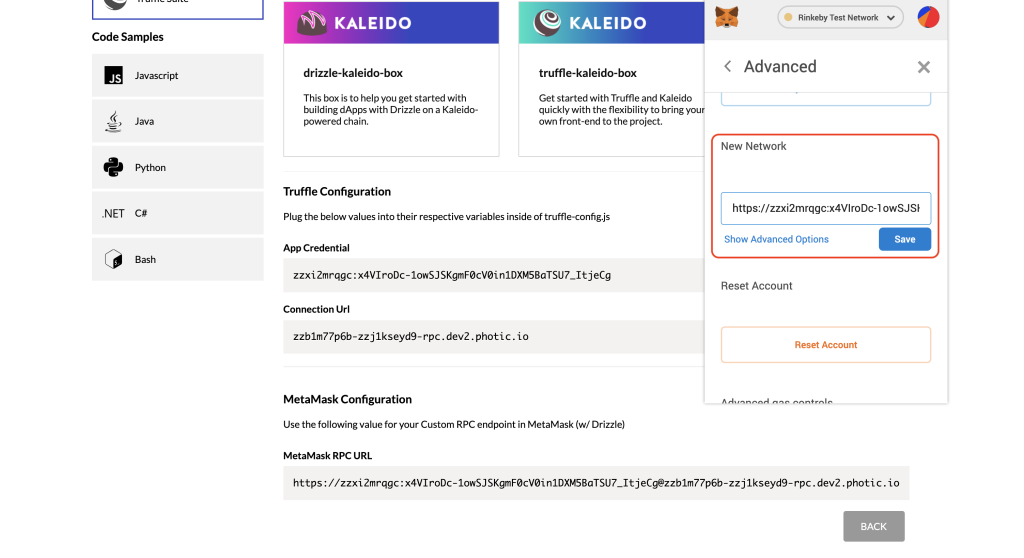
- Take the MetaMask RPC URL and paste it in the New Network field. Optionally, click the Advanced Settings tab to apply a name to your custom connection. This is useful for delineating between multiple environments.

-
Click Save to finalize the configuration.
-
Now change into your
/appdirectory and runnpm run startto kick off the app. The app is served locally on port 3000, with the interface exposed automatically. - Invoke the smart contract by entering an integer into the Stored Value field and clicking submit. This will update the underlying state of the storedData variable.
- The transaction object will be signed by the MetaMask account and delivered to the connected node.
